


Rozwiązywanie problemów
Higiena jamy ustnej
Varios Combi Pro2
- AWskazanie błędu
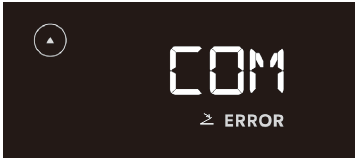 Przyczyna błędu
Komunikacja bezprzewodowa została przerwana podczas pracy w trybie ultradźwiękowym lub trybie proszkowym.
Sposób usunięcia błęduDotknąć przycisku anulowania.
 Wskazanie błędu
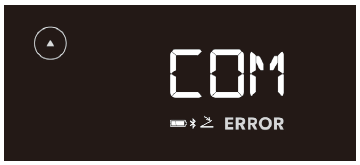 Przyczyna błędu
Komunikacja bezprzewodowa została przerwana podczas pracy w trybie ultradźwiękowym lub trybie proszkowym.
Sposób usunięcia błęduNacisnąć przycisk ON/OFF.
 Wskazanie błędu
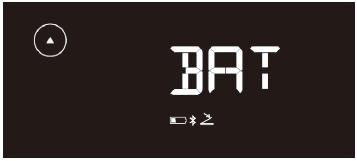 Wyświetlany jest komunikat
  „Battery”, a ikona baterii miga.Przyczyna błędu
Wyświetlany jest komunikat „BATTERY”,
a ikona baterii miga.
Poziom naładowania baterii wynosi mniej niż 10%.Sposób usunięcia błęduWymienić baterię. Patrz instrukcja obsługi „3.10 Instalowanie baterii sterownika nożnego”.
Przyczyna błędu i
i  migają naprzemiennie z dźwiękiem syreny.Przyczyna błędu
Przycisk ON/OFF sterownika nożnego został naciśnięty, mimo że komora nie jest zamocowana.
Sposób usunięcia błęduZamocować komorę do jednostki sterującej, a następnie uruchomić tryb proszkowy.
Wskazanie błędui  są wyświetlane, 0 i
  migają z sygnałem dźwiękowym.
 are flashing with beep sound.Przyczyna błędu
Przycisk ON/OFF sterownika nożnego został naciśnięty, mimo że poziom irygacji jest ustawiony na „0”.
Sposób usunięcia błęduObrócić pokrętło regulacji ilości wody i ustawić poziom irygacji (1–10).
Wskazanie błęduG/E/P oraz
 ikona migają naprzemiennie i emitowany jest sygnał dźwiękowy.Przyczyna błędu
Przycisk ON/OFF jest nadal naciskany podczas wychodzenia z trybu uśpienia.
Sposób usunięcia błęduZwolnić przycisk ON/OFF.
Wskazanie błędui  /// migają naprzemiennie z dźwiękiem beep.Przyczyna błędu
Przycisk ON/OFF jest nadal naciskany podczas wychodzenia z trybu uśpienia.
Sposób usunięcia błęduZwolnić przycisk ON/OFF.
- AERROR 0Opis błęduBłąd systemuKontrola / RozwiązanieWyłączyć jednostkę sterującą, a następnie włączyć ją ponownie. Jeśli błąd nadal występuje, skontaktować się z autoryzowanym dystrybutorem NSK.ERROR 1Opis błęduNieprawidłowe napięcie 24 VKontrola / RozwiązanieWyłączyć jednostkę sterującą, a następnie włączyć ją ponownie. Jeśli błąd nadal występuje, skontaktować się z autoryzowanym dystrybutorem NSK.ERROR 2Opis błęduNieprawidłowe napięcie 12 VKontrola / RozwiązanieWyłączyć jednostkę sterującą, a następnie włączyć ją ponownie. Jeśli błąd nadal występuje, skontaktować się z autoryzowanym dystrybutorem NSK.ERROR 3Opis błęduNieprawidłowe natężenie prądu pompyKontrola / RozwiązanieSprawdzić podłączenie pompy irygacyjnej. Jeśli błąd nadal występuje, skontaktować się z autoryzowanym dystrybutorem NSK.ERROR 4Opis błęduNieprawidłowe ciśnienie powietrzaKontrola / RozwiązanieSprawdzić ciśnienie doprowadzanego powietrza. Jeśli błąd nadal występuje, skontaktować się z autoryzowanym dystrybutorem NSK.ERROR 5Opis błęduNieprawidłowe napięcie grzałkiKontrola / RozwiązanieWyłączyć jednostkę sterującą, a następnie włączyć ją ponownie. Jeśli błąd nadal występuje, skontaktować się z autoryzowanym dystrybutorem NSK.ERROR 6Opis błęduNieprawidłowe natężenie prądu grzałkiKontrola / RozwiązanieWyłączyć jednostkę sterującą, a następnie włączyć ją ponownie. Jeśli błąd nadal występuje, skontaktować się z autoryzowanym dystrybutorem NSK.ERROR 7Opis błęduNieprawidłowa temperatura grzałkiKontrola / RozwiązanieSprawdzić obieg wody, a następnie doprowadzić wodę do jednostki sterującej. Odczekać, aż jednostka sterująca ostygnie, a następnie uruchomić ją ponownie. Jeśli błąd nadal występuje, skontaktować się z autoryzowanym dystrybutorem NSK.ERROR 8Opis błęduNieprawidłowa komunikacja ze sterownikiem nożnymKontrola / RozwiązanieSprawdzić połączenie sterownika nożnego. Jeśli błąd nadal występuje, skontaktować się z autoryzowanym dystrybutorem NSK.ERROR 9Opis błęduNieprawidłowe działanie rękojeści ultradźwiękowejKontrola / RozwiązanieSprawdzić podłączenie rękojeści ultradźwiękowej. Jeśli błąd nadal występuje, skontaktować się z autoryzowanym dystrybutorem NSK.ERROR 10Opis błęduNieprawidłowe natężenie prądu proporcjonalnego zaworu regulacji powietrzaKontrola / RozwiązanieWyłączyć jednostkę sterującą, a następnie włączyć ją ponownie. Jeśli błąd nadal występuje, skontaktować się z autoryzowanym dystrybutorem NSK.ERROR 12Opis błęduNieprawidłowa komunikacja z czujnikiem dotykowymKontrola / RozwiązanieWyłączyć jednostkę sterującą, a następnie włączyć ją ponownie. Jeśli błąd nadal występuje, skontaktować się z autoryzowanym dystrybutorem NSK.ERROR 13Opis błęduBłąd autodiagnostyki jednostki ultradźwiękowejKontrola / RozwiązanieWyłączyć jednostkę sterującą, a następnie włączyć ją ponownie. Jeśli błąd nadal występuje, skontaktować się z autoryzowanym dystrybutorem NSK.ERROR 14Opis błęduBłąd systemu jednostki ultradźwiękowejKontrola / RozwiązanieWyłączyć jednostkę sterującą, a następnie włączyć ją ponownie. Jeśli błąd nadal występuje, skontaktować się z autoryzowanym dystrybutorem NSK.
- APrzyczyna1Wtyczka jest nieprawidłowo podłączona do źródła zasilania.Rozwiązanie1Sprawdzić, czy wtyczka jest prawidłowo podłączona.Przyczyna2Nieprawidłowe działanie wyłącznika zasilania.Rozwiązanie2Skontaktować się z autoryzowanym dystrybutorem NSK*.Przyczyna3Przepalił się bezpiecznik.Rozwiązanie3Skontaktować się z autoryzowanym dystrybutorem NSK*.
* Usterki nie można usunąć w gabinecie stomatologicznym. Należy skontaktować się z autoryzowanym dystrybutorem NSK.
- APrzyczyna1Zasilanie zostało włączone, gdy sterownik nożny był naciśnięty.Rozwiązanie1Zwolnić sterownik nożny i włączyć zasilanie.Przyczyna2Nadmierne nagrzewanie jednostki sterującej.Rozwiązanie2Przerwać pracę i poczekać, aż jednostka sterująca ostygnie.
- APrzyczyna1Kalibracja jest nieznacznie przesunięta z powodu elektryczności statycznej, zakłóceń zewnętrznych itp.Rozwiązanie1Wyłączyć, a następnie ponownie włączyć zasilanie.Przyczyna2Przycisk nie został dotknięty na środku.Rozwiązanie2Dotknąć środka przycisku.Przyczyna3Nieprawidłowe działanie jednostki sterującej.Rozwiązanie3Skontaktować się z autoryzowanym dystrybutorem NSK*.
* Usterki nie można usunąć w gabinecie stomatologicznym. Należy skontaktować się z autoryzowanym dystrybutorem NSK.
- APrzyczyna1Pokrętło regulacji ilości wody jest uszkodzone.Rozwiązanie1Skontaktować się z autoryzowanym dystrybutorem NSK*.Przyczyna2Uszkodzenie lub zużycie pierścienia O-ring.Rozwiązanie2Wymienić pierścień O-ring na nowy. Patrz instrukcja obsługi „6.1.5 Złącze komory”.Przyczyna3Obieg wody został zablokowany przez ciała obce.Rozwiązanie3Przeprowadzić automatyczne czyszczenie. Jeśli problem nadal występuje, skontaktować się z autoryzowanym dystrybutorem NSK.
* Usterki nie można usunąć w gabinecie stomatologicznym. Należy skontaktować się z autoryzowanym dystrybutorem NSK.
- APrzyczyna1Nieprawidłowe działanie jednostki sterującej.Rozwiązanie1Skontaktować się z autoryzowanym dystrybutorem NSK*.Przyczyna2Ustawienie temperatury wody jest ustawione na „OFF”.Rozwiązanie2Ustawić ciepłą wodę na „ON”. Patrz instrukcja obsługi „7.3.2 Ustawianie ciepłej wody”.
* Usterki nie można usunąć w gabinecie stomatologicznym. Należy skontaktować się z autoryzowanym dystrybutorem NSK.
- APrzyczyna1Pokrywa butelki nie jest odpowiednio dokręcona.Rozwiązanie1Mocno dokręcić pokrywę butelki.Przyczyna2Zużyty pierścień O-ring lub uszczelka pokrywy butelki.Rozwiązanie2Wymienić pierścień O-ring lub uszczelkę na nową.Przyczyna3Butelka irygacyjna nie jest wsunięta do końca. (Między butelką irygacyjną a jednostką sterującą znajduje się szczelina.)Rozwiązanie3Wsunąć butelkę irygacyjną do końca. Upewnić się, że między butelką irygacyjną a jednostką sterującą nie ma szczeliny.
- APrzyczyna
Nie można nawiązać połączenia ze sterownikiem nożnym.
RozwiązanieWykonać następujące czynności.
1. Gdy na wyświetlaczu LCD pojawi się komunikat „PUSH FC”, nacisnąć i przytrzymać przycisk ON/OFF sterownika nożnego. Jeśli po pięciu minutach zawartość ekranu nie zmieni się, dotknąć przycisku anulowania
. 2. Wymienić baterie na nowe. 3. Nacisnąć i przytrzymać przycisk ON/OFF sterownika nożnego. Jeśli po pięciu minutach zawartość ekranu nie zmieni się, ponownie sparować jednostkę sterującą ze sterownikiem nożnym. Patrz instrukcja obsługi „7.3.1 Parowanie/rozłączanie sterownika nożnego”. Jeśli po wykonaniu czynności od 1 do 3 zawartość ekranu nadal się nie zmienia, skontaktować się z autoryzowanym dystrybutorem NSK. - APrzyczyna1Sterownik nożny nie został podłączony.Rozwiązanie1Wykonać następujące czynności. 1. Usunąć wszelkie przeszkody znajdujące się między jednostką sterującą a sterownikiem nożnym (które mogą zakłócać komunikację). 2. Wyłączyć zasilanie, a następnie włączyć je ponownie. 3. Wymienić baterie sterownika nożnego na nowe. 4. Sparować jednostkę sterującą ze sterownikiem nożnym. Patrz instrukcja obsługi „7.3.1 Parowanie/rozłączanie sterownika nożnego”. 5. Jeśli po wykonaniu czynności od 1 do 4 sterownik nożny nie może połączyć się z jednostką sterującą, skontaktować się z autoryzowanym dystrybutorem NSK.*Przyczyna2Słaba reakcja przycisków sterownika nożnego z powodu długiego okresu nieużywania.Rozwiązanie2Przeprowadzić kalibrację sterownika nożnego. Patrz instrukcja obsługi „7.3.8 Kalibracja sterownika nożnego”.Przyczyna3Nieprawidłowe działanie jednostki sterującej lub sterownika nożnego.Rozwiązanie3Wykonać następujące czynności. 1. Wymienić baterie sterownika nożnego na nowe. 2. Sparować jednostkę sterującą ze sterownikiem nożnym. Patrz instrukcja obsługi „7.3.1 Parowanie/rozłączanie sterownika nożnego”. 3. Nacisnąć przycisk ON/OFF sterownika nożnego, aby sprawdzić, czy produkt działa. Jeśli po wykonaniu czynności od 1 do 3 produkt nie działa, konieczna jest naprawa. Skontaktować się z autoryzowanym dystrybutorem NSK*.
* Usterki nie można usunąć w gabinecie stomatologicznym. Należy skontaktować się z autoryzowanym dystrybutorem NSK.
- APrzyczynaNieprawidłowe działanie jednostki sterującej.RozwiązanieSkontaktować się z autoryzowanym dystrybutorem NSK*.
- Usterki nie można usunąć w gabinecie stomatologicznym. Należy skontaktować się z autoryzowanym dystrybutorem NSK.
- APrzyczynaNieprawidłowe działanie jednostki sterującej.RozwiązanieSkontaktować się z autoryzowanym dystrybutorem NSK*.
* Usterki nie można usunąć w gabinecie stomatologicznym. Należy skontaktować się z autoryzowanym dystrybutorem NSK.
- APrzyczyna
Sterownik nożny nie został podłączony.
RozwiązanieWykonać następujące czynności.
1. Dotknąćprzycisku anulowania, aby skasować błąd.
2. Usunąć wszelkie przeszkody znajdujące się między jednostką sterującą a sterownikiem nożnym (które mogą zakłócać komunikację).
3. Poczekać na automatyczne połączenie sterownika nożnego. Jeśli połączenie nie zostanie nawiązane automatycznie, wykonać następujące czynności:
1. Wymienić baterie sterownika nożnego na nowe.
2. Sparować jednostkę sterującą ze sterownikiem nożnym. Patrz instrukcja obsługi „7.3.1 Parowanie/rozłączanie sterownika nożnego”.
3. Nacisnąć przycisk ON/OFF sterownika nożnego, aby sprawdzić, czy produkt działa. Jeśli po wykonaniu czynności od 1 do 3 błąd nadal występuje, konieczna jest naprawa.
Skontaktować się z autoryzowanym dystrybutorem NSK*.* Usterki nie można usunąć w gabinecie stomatologicznym. Należy skontaktować się z autoryzowanym dystrybutorem NSK.
- APrzyczyna
Baterie sterownika nożnego są bliskie rozładowania.
RozwiązanieWykonać następujące czynności.
1. Nacisnąć przycisk ON/OFF sterownika nożnego lub dotknąć przycisku anulowania,aby skasować komunikat „BATTERY”.
2. Wymienić baterie sterownika nożnego na nowe.
Jeśli po wykonaniu czynności od 1 do 2 komunikat „BATTERY” nie zniknie, konieczna jest naprawa.
Skontaktować się z autoryzowanym dystrybutorem NSK*.* Usterki nie można usunąć w gabinecie stomatologicznym. Należy skontaktować się z autoryzowanym dystrybutorem NSK.
- A
icon A:
PrzyczynaCzujnik wbudowany w uchwyt rękojeści ultradźwiękowej jest zabrudzony i błędnie wykrywa umieszczenie rękojeści ultradźwiękowej.RozwiązanieUsunąć zabrudzenia z czujnika wbudowanego w uchwyt rękojeści ultradźwiękowej. - APrzyczyna1Wtyczka przewodu zasilającego AC nie jest podłączona do gniazda sieciowego lub do gniazda nie jest doprowadzane zasilanie.Rozwiązanie1Sprawdzić połączenie.Przyczyna2Przepalił się bezpiecznik.Rozwiązanie2Skontaktować się z autoryzowanym dystrybutorem NSK*.Przyczyna3Końcówka nie jest odpowiednio dokręcona.Rozwiązanie3Ponownie dokręcić końcówkę kluczem do końcówek, obracając go do momentu usłyszenia kliknięcia i aż dalszy obrót nie będzie możliwy. Jeśli problem nadal występuje, wymienić klucz do końcówek, ponieważ może być zużyty.Przyczyna4Końcówka jest zużyta.Rozwiązanie4Wymienić końcówkę na nową.Przyczyna5Gwinty rękojeści ultradźwiękowej i końcówki są zabrudzone.Rozwiązanie5Dokładnie je wyczyścić.Przyczyna6Gwinty rękojeści ultradźwiękowej są zużyte wskutek długotrwałego użytkowania.Rozwiązanie6Skontaktować się z autoryzowanym dystrybutorem NSK*.Przyczyna7Moc nie została prawidłowo ustawiona dla końcówki.Rozwiązanie7Ustawić moc tak, aby nie przekraczała określonej górnej wartości granicznej podanej w dostarczonej instrukcji obsługi końcówki. Patrz instrukcja obsługi „1.2 Powiązane instrukcje”.Przyczyna8Sterownik nożny nie został podłączony.Rozwiązanie8Sparować jednostkę sterującą ze sterownikiem nożnym. Patrz instrukcja obsługi „7.3.1 Parowanie/rozłączanie sterownika nożnego”.Przyczyna9Awaria mechanizmu wibracyjnego w rękojeści ultradźwiękowej.Rozwiązanie9Skontaktować się z autoryzowanym dystrybutorem NSK*.Przyczyna10Awaria wewnętrznych elementów sterownika nożnego.Rozwiązanie10Skontaktować się z autoryzowanym dystrybutorem NSK*.Przyczyna11Czujnik wbudowany w uchwyt rękojeści ultradźwiękowej jest zabrudzony i błędnie wykrywa umieszczenie rękojeści ultradźwiękowej.Rozwiązanie11Dokładnie wyczyścić czujnik.
* Usterki nie można usunąć w gabinecie stomatologicznym. Należy skontaktować się z autoryzowanym dystrybutorem NSK.
- APrzyczynaMoc nie została prawidłowo ustawiona dla końcówki.RozwiązanieUstawić moc tak, aby nie przekraczała określonej górnej wartości granicznej podanej w dostarczonej instrukcji obsługi końcówki. Patrz instrukcja obsługi „1.2 Powiązane instrukcje”.
- APrzyczynaKońcówka nie jest odpowiednio dokręcona.RozwiązaniePonownie dokręcić końcówkę kluczem do końcówek, obracając go do momentu usłyszenia kliknięcia i aż dalszy obrót nie będzie możliwy. Jeśli problem nadal występuje, wymienić klucz do końcówek, ponieważ może być zużyty.Cause2The tip is not tightened firmly.Przyczyna3Awaria mechanizmu wibracyjnego rękojeści ultradźwiękowej lub wewnętrznych elementów jednostki sterującej.Przyczyna3Awaria mechanizmu wibracyjnego rękojeści ultradźwiękowej lub wewnętrznych elementów jednostki sterującej.Rozwiązanie3Skontaktować się z autoryzowanym dystrybutorem NSK*.
* Usterki nie można usunąć w gabinecie stomatologicznym. Należy skontaktować się z autoryzowanym dystrybutorem NSK.
- APrzyczyna1Moc nie została prawidłowo ustawiona dla końcówki.Rozwiązanie1Ustawić moc tak, aby nie przekraczała określonej górnej wartości granicznej podanej w dostarczonej instrukcji obsługi końcówki. Patrz instrukcja obsługi „1.2 Powiązane instrukcje”.Przyczyna2Końcówka nie jest odpowiednio dokręcona.Rozwiązanie2Ponownie dokręcić końcówkę kluczem do końcówek, obracając go do momentu usłyszenia kliknięcia i aż dalszy obrót nie będzie możliwy. Jeśli problem nadal występuje, wymienić klucz do końcówek, ponieważ może być zużyty.Przyczyna3Awaria mechanizmu wibracyjnego rękojeści ultradźwiękowej lub wewnętrznych elementów jednostki sterującej.Rozwiązanie3Skontaktować się z autoryzowanym dystrybutorem NSK*.
* Usterki nie można usunąć w gabinecie stomatologicznym. Należy skontaktować się z autoryzowanym dystrybutorem NSK.
- APrzyczyna1Moc nie została prawidłowo ustawiona dla końcówki.Rozwiązanie1Ponownie dokręcić końcówkę kluczem do końcówek, obracając go do momentu usłyszenia kliknięcia i aż dalszy obrót nie będzie możliwy. Jeśli problem nadal występuje, wymienić klucz do końcówek, ponieważ może być zużyty.Przyczyna2Końcówka nie jest odpowiednio dokręcona.Rozwiązanie2Ponownie dokręcić końcówkę kluczem do końcówek, obracając go do momentu usłyszenia kliknięcia i aż dalszy obrót nie będzie możliwy. Jeśli problem nadal występuje, wymienić klucz do końcówek, ponieważ może być zużyty.Przyczyna3Gwinty rękojeści ultradźwiękowej i końcówki są zabrudzone.Rozwiązanie3Dokładnie je wyczyścić.Przyczyna4Gwinty rękojeści ultradźwiękowej są zużyte wskutek długotrwałego użytkowania.Rozwiązanie4Skontaktować się z autoryzowanym dystrybutorem NSK.Przyczyna5Poziom irygacji jest niewystarczający lub irygacja została przerwana.Rozwiązanie5Zapewnić odpowiednią ilość płynu irygacyjnego.Przyczyna6Awaria mechanizmu wibracyjnego rękojeści ultradźwiękowej lub wewnętrznych elementów jednostki sterującej.Rozwiązanie6Skontaktować się z autoryzowanym dystrybutorem NSK.
- APrzyczyna1Przewód pompy irygacyjnej jest skręcony. (Podczas korzystania z butelki)Rozwiązanie1Wyprostować skręcony przewód irygacyjny.Przyczyna2Nadszedł czas na wymianę pompy irygacyjnej. (Podczas korzystania z butelki)Rozwiązanie2Wymienić pompę irygacyjną na nową. Patrz instrukcja obsługi „6.2 Wymiana pompy”.
- APrzyczyna1Woda nie jest doprowadzana do jednostki sterującej.Rozwiązanie1Sprawdzić obieg wody, aby zapewnić dopływ wody do jednostki sterującej. Ciśnienie doprowadzanej wody: 0,1–0,3 MPaPrzyczyna2Poziom irygacji nie został ustawiony.Rozwiązanie2Ustawić poziom irygacji, obracając pokrętło regulacji ilości wody. Patrz „Podczas korzystania z wody wodociągowej” w punkcie „3.13.1 Ustawianie trybu irygacji” instrukcji obsługi.Przyczyna3Dopływ wody może być niestabilny, gdy poziom irygacji jest niewystarczający.Rozwiązanie3Nie jest to usterka. Ustawić poziom irygacji, obracając pokrętło regulacji ilości wody. Patrz „Podczas korzystania z wody wodociągowej” w punkcie „3.13.1 Ustawianie trybu irygacji” instrukcji obsługi.Przyczyna4Filtr wody jest zatkany ciałami obcymi.Rozwiązanie4Wymienić filtr wody na nowy. Patrz instrukcja obsługi „6.3 Wymiana filtra wody”.
- APrzyczynaPrzewód doprowadzający wodę nie jest prawidłowo włożony do złącza przewodu wodnego.RozwiązanieWsunąć przewód doprowadzający wodę do końca i pewnie zamocować go w złączu przewodu wodnego. Patrz instrukcja obsługi „3.3 Podłączanie przewodu wodnego”.
- APrzyczyna1Pierścień O-ring w miejscu połączenia rękojeści ultradźwiękowej z przewodem rękojeści jest uszkodzony lub zużyty.Rozwiązanie1Wymienić pierścień O-ring na nowy. Patrz instrukcja obsługi „6.1.1 Przewód rękojeści”.Przyczyna2Awaria jednostki sterującej lub przewodu rękojeści.Rozwiązanie2Skontaktować się z autoryzowanym dystrybutorem NSK*.Przyczyna3Pręt szklany rękojeści ultradźwiękowej jest uszkodzony wskutek długotrwałego użytkowania.Rozwiązanie3Skontaktować się z autoryzowanym dystrybutorem NSK*.
* Usterki nie można usunąć w gabinecie stomatologicznym. Należy skontaktować się z autoryzowanym dystrybutorem NSK.
- A
icon B:
icon C: Przyczyna1Czujnik wbudowany w uchwyt rękojeści do terapii proszkowej jest zabrudzony i błędnie wykrywa umieszczenie rękojeści do terapii proszkowej.Rozwiązanie1Usunąć zabrudzenia z czujnika wbudowanego w uchwyt rękojeści do terapii proszkowej.Przyczyna2Komora nie jest prawidłowo zamocowana.Rozwiązanie2Zamocować komorę prawidłowo, aż będzie słychać kliknięcie. Patrz instrukcja obsługi „3.9 Mocowanie i zdejmowanie komory”. - A
icon D:
icon E: PrzyczynaAwaria jednostki sterującej (przerwany przewód). Uszkodzenie czujnika wbudowanego w komorę.RozwiązanieSkontaktować się z autoryzowanym dystrybutorem NSK*.* Usterki nie można usunąć w gabinecie stomatologicznym. Należy skontaktować się z autoryzowanym dystrybutorem NSK.
- APrzyczyna1Dysza jest odkształcona lub uszkodzona.Rozwiązanie1Wymienić dyszę na nową. Patrz instrukcja obsługi „4.2.3 Obsługa” – „■ Mocowanie dyszy”.Przyczyna2Wnętrze końcówki dyszy jest zatkane proszkiem.Rozwiązanie2Wymienić końcówkę dyszy na nową. Patrz instrukcja obsługi „4.2.3.2 Użytkowanie w trybie Perio” – „■ Używanie końcówki dyszy”.Przyczyna3Wnętrze rękojeści do terapii proszkowej jest zatkane proszkiem.Rozwiązanie3Wykonać następujące czynności. 1. Oczyścić podstawę dyszy za pomocą dostarczonego drutu czyszczącego (S). 2. Oczyścić końcówkę dyszy za pomocą dostarczonego pilnika czyszczącego. 3. Oczyścić wnętrze rękojeści do terapii proszkowej za pomocą drutu czyszczącego (L). Jeśli po wykonaniu powyższego czyszczenia proszek i powietrze nadal nie przepływają, przeprowadzić czyszczenie ultradźwiękowe w ciepłej wodzie. Patrz instrukcja obsługi „5.8 Czyszczenie ultradźwiękowe (co tydzień)”.Przyczyna4Wnętrze komory jest zatkane proszkiem.Rozwiązanie4Usunąć proszek z komory. Patrz instrukcja obsługi „5.5.1 Usuwanie proszku”.Przyczyna5Proszek częściowo zestalił się pod wpływem wody itp. w kanale powietrznym.Rozwiązanie5Usunąć proszek z kanału powietrznego. Patrz instrukcja obsługi „5.2.1 Ultradźwięki”.Przyczyna6Pojemnik z proszkiem pozostawiono otwarty, przez co proszek był wystawiony na działanie powietrza.Rozwiązanie6Zutylizować proszek i użyć nowego proszku.Przyczyna7W doprowadzanym powietrzu znajduje się woda.Rozwiązanie7Otworzyć filtr w obiegu doprowadzania powietrza, aby opróżnić sprężarkę, i sprawdzić, czy w filtrze powietrza oraz odpływie sprężarki nie zgromadziła się woda.Przyczyna8Element jest zatkany.Rozwiązanie8Skontaktować się z autoryzowanym dystrybutorem NSK*.
* Usterki nie można usunąć w gabinecie stomatologicznym. Należy skontaktować się z autoryzowanym dystrybutorem NSK.
- APrzyczynaPierścień O-ring jest uszkodzony.RozwiązanieWykonać następujące czynności. 1. Wymienić pierścień O-ring złącza przewodu rękojeści po stronie rękojeści. 2. Nałożyć kroplę dostarczonego oleju smarującego i rozprowadzić ją palcem. Patrz instrukcja obsługi „6.1.2 Przewód rękojeści (Prophy-Hose2/Perio-Hose2)”.
- APrzyczynaUszczelka jest zużyta lub uszkodzona.RozwiązanieSkontaktować się z autoryzowanym dystrybutorem NSK*.
* Usterki nie można usunąć w gabinecie stomatologicznym. Należy skontaktować się z autoryzowanym dystrybutorem NSK.
- APrzyczynaProszek przylega do gwintów komory i/lub pokrywy komory.RozwiązanieOczyścić gwinty pokrywy komory. Patrz instrukcja obsługi „5.5.3 Czyszczenie pokrywy komory”.
Varios Combi Pro
- APrzyczyna1Zasilanie zostało włączone, gdy sterownik nożny był naciśnięty.Rozwiązanie1Zwolnić sterownik nożny i ustawić przełącznik POWER w pozycji ON.Przyczyna2Nadmierne nagrzewanie jednostki sterującej.Rozwiązanie2Przerwać pracę i odczekać, aż jednostka sterująca ostygnie.
- APrzyczyna1Kalibracja jest nieznacznie przesunięta z powodu elektryczności statycznej, zakłóceń zewnętrznych itp.Rozwiązanie1Ustawić przełącznik POWER w pozycji OFF, a następnie w pozycji ON.Przyczyna2Przycisk nie został dotknięty na środku.Rozwiązanie2Dotknąć środka przycisku.
- APrzyczyna1Uszkodzenie lub zużycie pierścienia O-ring.Rozwiązanie1Postępować zgodnie z procedurą opisaną w punkcie „10-1-5 Złącze podstawy komory”, aby wymienić pierścień O-ring.Przyczyna2Ciała obce spowodowały niedrożność przewodu wodnego.Rozwiązanie2Przeprowadzić automatyczne czyszczenie. Jeśli problem nadal występuje, skontaktować się z autoryzowanym dystrybutorem NSK.
- APrzyczynaCzujnik wbudowany w uchwyt rękojeści jest zabrudzony i błędnie wykrywa umieszczenie rękojeści.RozwiązanieDokładnie wyczyścić czujnik.
- APrzyczyna1Wtyczka przewodu zasilającego AC nie jest podłączona do gniazda sieciowego lub do gniazda nie jest doprowadzane zasilanie.Rozwiązanie1Sprawdzić połączenie.Przyczyna2Bezpiecznik jest przepalony.Rozwiązanie2Patrz punkt „10-5 Wymiana bezpiecznika” i wymienić bezpiecznik.Przyczyna3Końcówka nie jest odpowiednio dokręcona.Rozwiązanie3Obracać klucz do końcówek do momentu usłyszenia kliknięcia i aż dalszy obrót nie będzie możliwy. Jeśli problem nadal występuje, wymienić klucz do końcówek, ponieważ może być zużyty.Przyczyna4Zużyta końcówka.Rozwiązanie4Wymienić końcówkę.Przyczyna5Gwintowane części rękojeści i końcówki są zabrudzone.Rozwiązanie5Dokładnie je wyczyścić.Przyczyna6Gwintowane części rękojeści są zużyte wskutek długotrwałego użytkowania.Rozwiązanie6Skontaktować się z autoryzowanym dystrybutorem NSK*.Przyczyna7Moc nie została prawidłowo ustawiona dla końcówki.Rozwiązanie7Ustawić moc tak, aby nie przekraczała maksymalnego poziomu mocy podanego w Tip-Power Guide lub na etykiecie opakowania końcówki.Przyczyna8Sterownik nożny jest odłączony.Rozwiązanie8Prawidłowo podłączyć przewód sterownika nożnego.Przyczyna9Awaria mechanizmu wibracyjnego w rękojeści.Rozwiązanie9Skontaktować się z autoryzowanym dystrybutorem NSK*.Przyczyna10Awaria wewnętrznych elementów sterownika nożnego.Rozwiązanie10Skontaktować się z autoryzowanym dystrybutorem NSK*.Przyczyna11Czujnik wbudowany w uchwyt rękojeści jest zabrudzony i błędnie wykrywa umieszczenie rękojeści.Rozwiązanie11Dokładnie wyczyścić czujnik.
* Usterki nie można usunąć w gabinecie itp.
- APrzyczynaMoc nie została prawidłowo ustawiona dla końcówki.RozwiązanieUstawić moc tak, aby nie przekraczała maksymalnego poziomu mocy podanego w Tip-Power Guide lub na etykiecie opakowania końcówki.
- APrzyczynaKońcówka nie jest odpowiednio dokręcona.RozwiązanieDokręcić końcówkę do momentu kliknięcia klucza do końcówek.
- APrzyczyna1Moc nie została prawidłowo ustawiona dla końcówki.Rozwiązanie1Ustawić moc tak, aby nie przekraczała maksymalnego poziomu mocy podanego w Tip-Power Guide lub na etykiecie opakowania końcówki.Przyczyna2Końcówka nie jest odpowiednio dokręcona.Rozwiązanie2Obracać klucz do końcówek do momentu usłyszenia kliknięcia i aż dalszy obrót nie będzie możliwy. Jeśli problem nadal występuje, wymienić klucz do końcówek, ponieważ może być zużyty.Przyczyna3Awaria mechanizmu wibracyjnego w rękojeści lub jednostce sterującej.Rozwiązanie3Skontaktować się z autoryzowanym dystrybutorem NSK*.
* Usterki nie można usunąć w gabinecie itp.
- APrzyczyna1Moc nie została prawidłowo ustawiona dla końcówki.Rozwiązanie1Ustawić moc tak, aby nie przekraczała maksymalnego poziomu mocy podanego w Tip-Power Guide lub na etykiecie opakowania końcówki.Przyczyna2Końcówka nie jest odpowiednio dokręcona.Rozwiązanie2Obracać klucz do końcówek do momentu usłyszenia kliknięcia i aż dalszy obrót nie będzie możliwy. Jeśli problem nadal występuje, wymienić klucz do końcówek, ponieważ może być zużyty.Przyczyna3Gwintowane części rękojeści i końcówki są zabrudzone.Rozwiązanie3Dokładnie je wyczyścić.Przyczyna4Gwintowane części rękojeści są zużyte wskutek długotrwałego użytkowania.Rozwiązanie4Skontaktować się z autoryzowanym dystrybutorem NSK*.Przyczyna5Poziom irygacji jest niewystarczający lub irygacja została przerwana.Rozwiązanie5Zapewnić odpowiednią ilość płynu irygacyjnego.Przyczyna6Awaria mechanizmu wibracyjnego w rękojeści lub jednostce sterującej.Rozwiązanie6Skontaktować się z autoryzowanym dystrybutorem NSK*.
* Usterki nie można usunąć w gabinecie itp.
- APrzyczyna1Przewód irygacyjny jest skręcony.Rozwiązanie1Wyprostować skręcony przewód irygacyjny.Przyczyna2Nadszedł czas na wymianę pompy irygacyjnej.Rozwiązanie2Wymienić pompę irygacyjną na nową (patrz „10-2 Wymiana pompy irygacyjnej”).
- APrzyczyna1Woda nie jest doprowadzana do jednostki sterującej.Rozwiązanie1Sprawdzić obieg wody, aby zapewnić dopływ wody do jednostki sterującej. Ciśnienie doprowadzanej wody: 0,1–0,3 MPaPrzyczyna2Poziom irygacji jest ustawiony na „0”.Rozwiązanie2Ustawić odpowiedni poziom irygacji za pomocą ustawienia poziomu irygacji.Przyczyna3Dopływ wody może być niestabilny, gdy poziom irygacji jest niewystarczający.Rozwiązanie3Nie jest to usterka. Zwiększyć poziom irygacji za pomocą ustawienia poziomu irygacji.Przyczyna4Filtr wody jest zatkany ciałami obcymi.Rozwiązanie4Wymienić filtr wody na nowy.
- APrzyczyna1Przewód irygacyjny nie jest prawidłowo podłączony.Rozwiązanie1Wsunąć przewód irygacyjny do końca i pewnie zamocować go w złączu irygacyjnym.Przyczyna2Pierścień O-ring przy przewodzie rękojeści jest zużyty lub uszkodzony.Rozwiązanie2Wymienić pierścień O-ring na nowy, postępując zgodnie z procedurą opisaną w punkcie „10-1-1 Przewód rękojeści”.Przyczyna3Obieg wody w jednostce sterującej jest uszkodzony.Rozwiązanie3Skontaktować się z autoryzowanym dystrybutorem NSK*.
* Usterki nie można usunąć w gabinecie itp.
- APrzyczyna1Rękojeść nie jest prawidłowo podłączona do przewodu rękojeści.Przyczyna2Awaria jednostki sterującej.Przyczyna2Awaria jednostki sterującej.Rozwiązanie2Skontaktować się z autoryzowanym dystrybutorem NSK*.
* Usterki nie można usunąć w gabinecie itp.
- APrzyczyna1Czujnik wbudowany w uchwyt rękojeści jest zabrudzony i błędnie wykrywa umieszczenie rękojeści.Rozwiązanie1Dokładnie wyczyścić czujnik.Przyczyna2Komora nie jest prawidłowo zamocowana.Rozwiązanie2Prawidłowo zamocować komorę, aż będzie słychać dźwięk potwierdzenia.
- APrzyczynaAwaria jednostki sterującej (rozłączenie).RozwiązanieSkontaktować się z autoryzowanym dystrybutorem NSK*.
* Usterki nie można usunąć w gabinecie itp.
- APrzyczyna1Wnętrze końcówki dyszy jest zatkane proszkiem.Rozwiązanie1Wymienić końcówkę dyszy.Przyczyna2Wnętrze rękojeści jest zatkane proszkiem.Rozwiązanie2Oczyścić podstawę dyszy za pomocą dostarczonego drutu czyszczącego (małego), a końcówkę dyszy za pomocą pilnika czyszczącego. Ponadto oczyścić wnętrze rękojeści za pomocą drutu czyszczącego (dużego). Jeśli po wykonaniu powyższego czyszczenia proszek i powietrze nadal nie przepływają, przeprowadzić czyszczenie ultradźwiękowe w ciepłej wodzie. (Patrz „9–3 Czyszczenie ultradźwiękowe (co tydzień)”).Przyczyna3Wnętrze komory jest zatkane proszkiem.Rozwiązanie3Usunąć proszek z wnętrza komory, postępując zgodnie z procedurami opisanymi w punkcie „9–1–5 Komora i przewód rękojeści”.Przyczyna4Proszek częściowo zestalił się pod wpływem wody itp. w kanale powietrznym.Rozwiązanie4Usunąć proszek z wnętrza kanału, postępując zgodnie z procedurami opisanymi w punkcie „9–1–4–2 Automatyczne czyszczenie”.Przyczyna5Pojemnik z proszkiem pozostawiono otwarty, przez co proszek był wystawiony na działanie powietrza.Rozwiązanie5Zutylizować proszek i użyć nowego proszku.Przyczyna6W doprowadzanym powietrzu znajduje się woda.Rozwiązanie6Otworzyć filtr w obiegu doprowadzania powietrza, aby opróżnić sprężarkę, i sprawdzić, czy w filtrze powietrza oraz odpływie sprężarki nie zgromadziła się woda.Przyczyna7Element VCP jest zatkany.Rozwiązanie7Skontaktować się z autoryzowanym dystrybutorem NSK*.
* Usterki nie można usunąć w gabinecie itp.
- APrzyczynaPierścień O-ring jest uszkodzony.RozwiązanieWymienić pierścień O-ring w miejscu połączenia rękojeści, nałożyć dostarczony olej turbinowy i rozprowadzić go palcem. (Patrz „10-1-2 Przewód rękojeści (do zastosowań Prophy i Perio)”).
- APrzyczynaPrzycisk jest zablokowany.RozwiązaniePostępować zgodnie z procedurą „Zwalnianie przycisku blokady” w punkcie „9–1–5 Komora i przewód rękojeści”, aby zwolnić blokadę. Jeśli problem nadal występuje, skontaktować się z autoryzowanym dystrybutorem NSK*.
* Usterki nie można usunąć w gabinecie itp.
- APrzyczynaProszek przylega do gwintów komory i/lub pokrywy komory.RozwiązanieOczyścić gwinty pokrywy komory (patrz „Czyszczenie pokrywy komory” w punkcie „9-1-5-2 Czyszczenie i dezynfekcja”).
Varios2 Ultrasonic Handpiece
- APrzyczyna1Gwinty rękojeści ultradźwiękowej są zużyte wskutek długotrwałego użytkowania.Rozwiązanie1Dokładnie je wyczyścić.Przyczyna2Gwinty rękojeści ultradźwiękowej są zużyte wskutek długotrwałego użytkowania.Rozwiązanie2Skontaktować się z autoryzowanym dystrybutorem NSK*.Przyczyna3Awaria mechanizmu wibracyjnego w rękojeści ultradźwiękowej.Rozwiązanie3Skontaktować się z autoryzowanym dystrybutorem NSK*.
* Usterki nie można usunąć w gabinecie stomatologicznym. Należy skontaktować się z autoryzowanym dystrybutorem NSK.
- APrzyczyna1Moc nie została prawidłowo ustawiona dla końcówki.Rozwiązanie1Ustawić moc tak, aby nie przekraczała określonej górnej wartości granicznej podanej w dostarczonej instrukcji obsługi końcówki. Patrz instrukcja obsługi „Powiązane instrukcje”.Przyczyna2Końcówka nie jest odpowiednio dokręcona.Rozwiązanie2Ponownie dokręcić końcówkę kluczem do końcówek, obracając go do momentu usłyszenia kliknięcia i aż dalszy obrót nie będzie możliwy. Jeśli problem nadal występuje, wymienić klucz do końcówek, ponieważ może być zużyty.Przyczyna3Awaria mechanizmu wibracyjnego rękojeści ultradźwiękowej lub wewnętrznych elementów jednostki sterującej.Rozwiązanie3Skontaktować się z autoryzowanym dystrybutorem NSK*.
* Usterki nie można usunąć w gabinecie stomatologicznym. Należy skontaktować się z autoryzowanym dystrybutorem NSK.
- APrzyczyna1Moc nie została prawidłowo ustawiona dla końcówki.Rozwiązanie1Ustawić moc tak, aby nie przekraczała określonej górnej wartości granicznej podanej w dostarczonej instrukcji obsługi końcówki. Patrz instrukcja obsługi „Powiązane instrukcje”.Przyczyna2Końcówka nie jest odpowiednio dokręcona.Rozwiązanie2Ponownie dokręcić końcówkę kluczem do końcówek, obracając go do momentu usłyszenia kliknięcia i aż dalszy obrót nie będzie możliwy. Jeśli problem nadal występuje, wymienić klucz do końcówek, ponieważ może być zużyty.Przyczyna3Gwinty rękojeści ultradźwiękowej są zużyte wskutek długotrwałego użytkowania.Rozwiązanie3Dokładnie je wyczyścić.Przyczyna4Gwinty rękojeści ultradźwiękowej są zużyte wskutek długotrwałego użytkowania.Rozwiązanie4Skontaktować się z autoryzowanym dystrybutorem NSK*.Przyczyna5Awaria mechanizmu wibracyjnego rękojeści ultradźwiękowej lub wewnętrznych elementów jednostki sterującej.Rozwiązanie5Skontaktować się z autoryzowanym dystrybutorem NSK*.
* Usterki nie można usunąć w gabinecie stomatologicznym. Należy skontaktować się z autoryzowanym dystrybutorem NSK.
- APrzyczynaRękojeść ultradźwiękowa została upuszczona lub uległa pogorszeniu wskutek zużycia albo zastosowano niezalecane środki chemiczne.RozwiązanieSkontaktować się z autoryzowanym dystrybutorem NSK*.
* Usterki nie można usunąć w gabinecie stomatologicznym. Należy skontaktować się z autoryzowanym dystrybutorem NSK.
Water Bottle Kit
- APrzyczyna1Filtr jest zatkany wskutek zużycia z upływem czasu.Rozwiązanie1Należy wymienić filtr powietrza. Skontaktować się z autoryzowanym dystrybutorem NSK.Przyczyna2Przewód wodny jest zagięty lub przyciśnięty.Rozwiązanie2Patrz instrukcja obsługi „3.2 Podłączanie przewodu” i prawidłowo podłączyć przewód wodny.
- APrzyczyna1Zużyty pierścień O-ring lub uszczelka pokrywy butelki.Rozwiązanie1Wymienić pierścień O-ring lub uszczelkę na nowe.Przyczyna2Uszkodzona butelka lub pokrywa butelki.Rozwiązanie2Wymienić butelkę lub pokrywę butelki na nową.
- APrzyczyna1Uszkodzona część napędowa wewnątrz modułu butelki na wodę.Rozwiązanie1Skontaktować się z autoryzowanym dystrybutorem NSK.Przyczyna2Uszkodzona część obiegu powietrza wewnątrz modułu butelki na wodę.Rozwiązanie2Skontaktować się z autoryzowanym dystrybutorem NSK.Przyczyna3Zastosowano ciśnienie doprowadzanego powietrza wykraczające poza określony zakres.Rozwiązanie3Sprawdzić ciśnienie zasilania i ustawić je na określoną wartość. Jeśli po regulacji nadal występuje wyciek powietrza, skontaktować się z autoryzowanym dystrybutorem NSK.
- APrzyczyna1Pierścień O-ring jest zużyty.Rozwiązanie1Wymienić pierścień O-ring.Przyczyna2Uszkodzenie wewnątrz modułu butelki na wodę.Rozwiązanie2Skontaktować się z autoryzowanym dystrybutorem NSK.
Varios 970
- APrawdopodobna przyczyna
Panel przedni nie świeci się, mimo że przełącznik zasilania jest ustawiony w pozycji ON.
Przyczyna1Przewód zasilający lub wtyczka jest odłączona.Rozwiązanie1Prawidłowo podłączyć przewód zasilający lub wtyczkę.Przyczyna2Bezpiecznik jest przepalony.Rozwiązanie2Skontaktować się z dystrybutorem.** Naprawy nie mogą być wykonywane przez użytkownika.
- APrawdopodobna przyczyna
Końcówka nie wibruje pomimo naciśnięcia sterownika nożnego.
Przyczyna1Końcówka nie jest odpowiednio dokręcona.Rozwiązanie1Dokręcić końcówkę do momentu kliknięcia klucza do końcówek.Przyczyna2Zużyta końcówka.Rozwiązanie2Wymienić końcówkę.Przyczyna3Moc nie została prawidłowo ustawiona dla końcówki.Rozwiązanie3Ustawić moc zgodnie z Power Guide lub etykietą opakowania końcówki. Nie przekraczać podanej wartości.Przyczyna4Sterownik nożny jest odłączony.Rozwiązanie4Prawidłowo podłączyć sterownik nożny.Przyczyna5Awaria mechanizmu wibracyjnego w rękojeści.Rozwiązanie5Skontaktować się z dystrybutorem.*Przyczyna6Awaria wewnętrznych elementów sterownika nożnego.Rozwiązanie6Skontaktować się z dystrybutorem.** Naprawy nie mogą być wykonywane przez użytkownika.
- APrzyczynaMoc nie została prawidłowo ustawiona dla końcówki.RozwiązanieUstawić poziom mocy zgodnie z Power Guide, jak wskazano na etykiecie opakowania końcówki. Nie przekraczać podanej wartości.
- APrzyczynaKońcówka nie jest odpowiednio dokręcona.RozwiązanieDokręcić końcówkę do momentu kliknięcia klucza do końcówek.
- APrzyczyna1Moc nie została prawidłowo ustawiona dla końcówki.Rozwiązanie1Ustawić poziom mocy zgodnie z Power Guide, jak wskazano na etykiecie opakowania końcówki. Nie przekraczać podanej wartości.Przyczyna2Końcówka nie jest odpowiednio dokręcona.Rozwiązanie2Dokręcić końcówkę do momentu kliknięcia klucza do końcówek.Przyczyna3Awaria mechanizmu wibracyjnego w rękojeści lub jednostce sterującej.Rozwiązanie3Skontaktować się z dystrybutorem.*
* Naprawy nie mogą być wykonywane przez użytkownika.
- APrzyczyna1Moc nie została prawidłowo ustawiona dla końcówki.Rozwiązanie1Ustawić poziom mocy zgodnie z Power Guide, jak wskazano na etykiecie opakowania końcówki. Nie przekraczać podanej wartości.Przyczyna2Końcówka nie jest odpowiednio dokręcona.Rozwiązanie2Dokręcić końcówkę do momentu kliknięcia klucza do końcówek.Przyczyna3Awaria mechanizmu wibracyjnego w rękojeści lub jednostce sterującej.Rozwiązanie3Skontaktować się z dystrybutorem.*
* Naprawy nie mogą być wykonywane przez użytkownika.
- APrawdopodobna przyczyna1Pompa irygacyjna pracuje.Przyczyna1Przewód jest skręcony.Rozwiązanie1Wyprostować skręcony przewód irygacyjny.Prawdopodobna przyczyna2Pompa irygacyjna nie pracuje.Przyczyna2Nadszedł czas na wymianę pompy irygacyjnej. (Po około 500 godzinach użytkowania).Rozwiązanie2Wymienić pompę irygacyjną na nową (patrz 11. (4) Wymiana pompy irygacyjnej).
- APrawdopodobna przyczynaWoda nie dociera do jednostki sterującej.RozwiązanieSprawdzić obieg wody i dopływ wody do jednostki sterującej. Ciśnienie wody: 0,1–0,5 MPa (1–5 kgf/cm²)
- APrawdopodobna przyczyna
Sprawdzić, czy woda dociera do jednostki sterującej.
Przyczyna1Pokrętło regulacji wody jest zamknięte.Rozwiązanie1Obrócić pokrętło regulacji wody i ustawić odpowiednią ilość wody.Przyczyna2Dopływ płynu irygacyjnego zostaje przerwany przy niskim natężeniu przepływu (poniżej 10 ml/min).Rozwiązanie2Nie jest to usterka. Obrócić pokrętło regulacji wody i zwiększyć poziom irygacji.Przyczyna3Filtr wody jest zatkany.Rozwiązanie3Wymienić filtr wody na nowy (patrz 11. (6) Wymiana filtra wody (opcja)). - APrawdopodobna przyczyna1Woda wycieka z miejsca połączenia przewodu irygacyjnego ze złączem irygacyjnym.Przyczyna1Przewód irygacyjny nie jest prawidłowo podłączony.Rozwiązanie1Wsunąć przewód irygacyjny do końca i pewnie zamocować go w złączu irygacyjnym.Prawdopodobna przyczyna2Woda wycieka z miejsca połączenia rękojeści z przewodem.Przyczyna2Pierścień O-ring przy przewodzie rękojeści jest zużyty lub uszkodzony.Rozwiązanie2Wymienić pierścień O-ring na nowy (patrz 11 (3) Wymiana pierścienia O-ring • Przewód rękojeści).Prawdopodobna przyczyna3Woda wycieka z jednostki sterującej.Przyczyna3Obieg wody w jednostce sterującej jest uszkodzony.Rozwiązanie3Skontaktować się z dystrybutorem.*
* Naprawy nie mogą być wykonywane przez użytkownika.
- APrawdopodobna przyczyna1Końcówka oscyluje, ale dioda LED rękojeści włącza się i wyłącza.Przyczyna1Rękojeść nie jest prawidłowo podłączona do przewodu rękojeści.Rozwiązanie1Wsunąć rękojeść do końca i pewnie zamocować ją w przewodzie rękojeści.Prawdopodobna przyczyna2Końcówka oscyluje, ale dioda LED rękojeści nie włącza się.Przyczyna2Przerwanie połączenia w przewodzie rękojeści lub awaria jednostki sterującej.Rozwiązanie2Skontaktować się z dystrybutorem.*
* Naprawy nie mogą być wykonywane przez użytkownika.
- APrawdopodobna przyczyna1Sygnał dźwiękowy podczas włączania zasilania.Przyczyna1Sterownik nożny jest naciśnięty.Rozwiązanie1Zwolnić sterownik nożny.Prawdopodobna przyczyna2Sygnał dźwiękowy podczas zatrzymywania wibracji końcówki.Przyczyna2Nadmierne nagrzewanie jednostki sterującej.Rozwiązanie2Przerwać pracę i odczekać, aż jednostka sterująca ostygnie.
Varios 170
- AElement do sprawdzenia
Końcówka nie wibruje pomimo naciśnięcia sterownika nożnego.
Przyczyna1Końcówka nie jest odpowiednio dokręcona.Rozwiązanie1Dokręcić końcówkę do momentu kliknięcia klucza do końcówek.Przyczyna2Zużyta końcówka.Rozwiązanie2Wymienić końcówkę.Przyczyna3Moc nie została prawidłowo ustawiona dla końcówki.Rozwiązanie3Ustawić poziom mocy zgodnie z Power Guide. Nie przekraczać maksymalnej wartości podanej na etykiecie końcówki.Przyczyna4Awaria mechanizmu wibracyjnego w rękojeści.Rozwiązanie4Skontaktować się z dystrybutorem.** Naprawy nie mogą być wykonywane przez użytkownika.
- APrzyczynaMoc nie została prawidłowo ustawiona dla końcówki.RozwiązanieUstawić poziom mocy zgodnie z Power Guide. Nie przekraczać maksymalnej wartości podanej na etykiecie końcówki.
- APrzyczynaKońcówka nie jest odpowiednio dokręcona.RozwiązanieDokręcić końcówkę do momentu kliknięcia klucza do końcówek.
- APrzyczyna1Moc nie została prawidłowo ustawiona dla końcówki.Rozwiązanie1Ustawić poziom mocy zgodnie z Power Guide. Nie przekraczać maksymalnej wartości podanej na etykiecie końcówki.Przyczyna2Końcówka nie jest odpowiednio dokręcona.Rozwiązanie2Dokręcić końcówkę do momentu kliknięcia klucza do końcówek.Przyczyna3Awaria mechanizmu wibracyjnego w rękojeści lub module.Rozwiązanie3Skontaktować się z dystrybutorem.*
* Naprawy nie mogą być wykonywane przez użytkownika.
- APrzyczyna1Moc nie została prawidłowo ustawiona dla końcówki.Rozwiązanie1Ustawić poziom mocy zgodnie z Power Guide. Nie przekraczać maksymalnej wartości podanej na etykiecie końcówki.Przyczyna2Końcówka nie jest odpowiednio dokręcona.Rozwiązanie2Dokręcić końcówkę do momentu kliknięcia klucza do końcówek.Przyczyna3Awaria mechanizmu wibracyjnego w rękojeści lub module.Rozwiązanie3Skontaktować się z dystrybutorem.*
* Naprawy nie mogą być wykonywane przez użytkownika.
- AElement do sprawdzeniaWoda nie dociera do rękojeści.RozwiązanieSprawdzić obieg wody i dopływ wody do unitu stomatologicznego.
- AElement do sprawdzenia
Odłączyć rękojeść od przewodu rękojeści. Woda nie wypływa lub wypływa w niewielkiej ilości.
Przyczyna1Pokrętło regulacji wody jest zamknięte.Rozwiązanie1Obrócić pokrętło regulacji wody i ustawić odpowiedni poziom wody.Przyczyna2Filtr wody jest zatkany.Rozwiązanie2Skontaktować się z dystrybutorem.** Naprawy nie mogą być wykonywane przez użytkownika.
- AElement do sprawdzenia
Brak / słaby wypływ wody z rękojeści.
PrzyczynaW otworze mogą znajdować się ciała obce.RozwiązaniePrzedmuchać otwór od tylnej strony rękojeści za pomocą urządzenia, takiego jak strzykawka. Jeśli problem nadal występuje, skontaktować się z dystrybutorem. - AElement do sprawdzenia
Woda wycieka z miejsca połączenia rękojeści z przewodem.
PrzyczynaPierścień O-ring przy przewodzie rękojeści jest zużyty lub uszkodzony.RozwiązaniePrzedmuchać tylną część rękojeści powietrzem za pomocą urządzenia, takiego jak strzykawka 3-w-1. Jeśli problem nadal występuje, skontaktować się z dystrybutorem. - AElement do sprawdzenia1Końcówka oscyluje, ale dioda LED rękojeści włącza się i wyłącza.Przyczyna1Rękojeść nie jest prawidłowo podłączona do przewodu rękojeści.Rozwiązanie1Wsunąć rękojeść do końca i pewnie zamocować ją w przewodzie rękojeści.Element do sprawdzenia2Końcówka oscyluje, ale dioda LED rękojeści nie włącza się.Przyczyna2Przerwanie połączenia w przewodzie rękojeści lub awaria modułu.Rozwiązanie2Skontaktować się z dystrybutorem.*
* Naprawy nie mogą być wykonywane przez użytkownika.
Chirurgia
VarioSurg 4
- APrzyczyna błęduBłąd autokontroli.DziałanieZlecić naprawę.
- APrzyczyna błędu1Końcówka jest przeciążona.Działanie1Należy uważać, aby nie przeciążyć końcówki. Jeśli końcówka utknie w miejscu zabiegu, nacisnąć główny pedał sterownika nożnego i powoli wyciągnąć końcówkę podczas jej oscylacji (nie wyciągać jej na siłę).Przyczyna błędu2Końcówka nie jest zamontowana lub nie została wystarczająco dokręcona.Działanie2Zamontować końcówkę i dokręcić ją kluczem do wymiany końcówek do momentu „kliknięcia” i swobodnego obracania się klucza.Przyczyna błędu3Przewód rękojeści nie jest prawidłowo podłączony. Przerwanie połączenia w przewodzie rękojeści.Działanie3Sprawdzić podłączenie przewodu rękojeści. Jeśli problem nadal występuje, skontaktować się z autoryzowanym dystrybutorem NSK.
- APrzyczyna błęduNieprawidłowe podłączenie przewodu zasilającego. Awaria obwodu zasilania.DziałaniePonownie prawidłowo podłączyć przewód zasilający. Jeśli błędu nie można usunąć, zlecić naprawę.
- APrzyczyna błęduPrzegrzanie spowodowane długotrwałym użytkowaniem pod dużym obciążeniem. Użycie bezpośrednio po przebywaniu jednostki sterującej w wysokiej temperaturze (np. wewnątrz samochodu wystawionego na intensywne działanie promieni słonecznych lub w szafce narażonej na bezpośrednie działanie promieni słonecznych).DziałaniePrzed użyciem pozostawić urządzenie do ostygnięcia. Aby zapewnić odpowiednie odprowadzanie ciepła, należy w miarę możliwości zapewnić dobrą wentylację wokół jednostki sterującej. Jeśli błędu nie można usunąć, zlecić naprawę.
- APrzyczyna błęduPrzewód irygacyjny został przytrzaśnięty przez rolkę pompy. Awaria pompy irygacyjnej.DziałanieSprawdzić przewód irygacyjny. Jeśli błędu nie można usunąć, zlecić naprawę.
- APrzyczyna błęduAwaria obwodu komunikacji Bluetooth (system rękojeści LED) wewnątrz jednostki sterującej.DziałanieZlecić naprawę.
- APrzyczyna błęduAwaria czujnika w bezprzewodowym sterowniku nożnym. Wykrycie przerwania komunikacji Bluetooth podczas wibracji ultradźwiękowych.DziałanieZlecić naprawę.
- APrzyczyna błęduRękojeść lub końcówka nie jest podłączona.DziałanieSprawdzić, czy przewód rękojeści jest prawidłowo podłączony oraz czy końcówka jest prawidłowo zamocowana za pomocą klucza do końcówek. Jeśli problem nadal występuje, skontaktować się z autoryzowanym dystrybutorem NSK.
- APrzyczyna błęduNieprawidłowe działanie ekranu panelu sterowaniaDziałanieZlecić naprawę.
- APrzyczyna błęduAwaria obwodu komunikacji Bluetooth (system połączenia z Surgic Pro2) wewnątrz jednostki sterującej.DziałanieZlecić naprawę.
- APrzyczyna błęduAwaria przewodowego sterownika nożnego.DziałanieUpewnić się, że złącze przewodowego sterownika nożnego jest prawidłowo podłączone. Jeśli problem nadal występuje, skontaktować się z autoryzowanym dystrybutorem NSK.
- APrzyczyna problemu1Wtyczka jest nieprawidłowo podłączona do źródła zasilania.Działanie1Sprawdzić, czy wtyczka jest prawidłowo podłączona.Przyczyna problemu2Awaria wyłącznika zasilania.Działanie2Zlecić naprawę.
- APrzyczyna problemu1Zasilanie zostało włączone przy naciśniętym sterowniku nożnym.Działanie1Zdjąć stopę ze sterownika nożnego.Przyczyna problemu2Awaria sterownika nożnego.Działanie2Jeśli problem ustępuje po wyjęciu baterii, oznacza to awarię sterownika nożnego. Jeśli nie, oznacza to awarię jednostki sterującej. Skontaktować się z autoryzowanym dystrybutorem NSK.Przyczyna problemu3Awaria jednostki sterującej.Działanie3Jeśli problem ustępuje po wyjęciu baterii, oznacza to awarię sterownika nożnego. Jeśli nie, oznacza to awarię jednostki sterującej. Skontaktować się z autoryzowanym dystrybutorem NSK.
- APrzyczyna problemu
Bezprzewodowy sterownik nożny nie jest połączony.
DziałanieNaciskać i przytrzymywać główny pedał bezprzewodowego sterownika nożnego, gdy na wyświetlaczu LCD widoczny jest komunikat „PUSH FC”. Jeśli ekran nie zmieni się po 5 minutach, nacisnąć przycisk anulowania. Zostanie wyświetlony standardowy ekran.

Wymienić baterie bezprzewodowego sterownika nożnego, aby sprawdzić, czy można nawiązać połączenie. => „3.2 Instalowanie baterii (tylko bezprzewodowy sterownik nożny)”.
Jeśli po wymianie baterii nie można nawiązać połączenia, sparować jednostkę sterującą z bezprzewodowym sterownikiem nożnym. => „7.2 Parowanie z bezprzewodowym sterownikiem nożnym”.
Jeśli problem nadal występuje, skontaktować się z autoryzowanym dystrybutorem NSK. - APrzyczyna problemu1Bezprzewodowy sterownik nożny nie jest połączony.Działanie1Po upewnieniu się, że nic nie blokuje sygnału między bezprzewodowym sterownikiem nożnym a jednostką sterującą, wykonać następujące czynności. ・Wyłączyć główny wyłącznik zasilania, a następnie ponownie go włączyć, aby nawiązać połączenie z jednostką sterującą. ・Wymienić baterie bezprzewodowego sterownika nożnego na nowe. => „3.2 Instalowanie baterii (tylko bezprzewodowy sterownik nożny)”. ・Sparować jednostkę sterującą z bezprzewodowym sterownikiem nożnym. => „7.2 Parowanie z bezprzewodowym sterownikiem nożnym”. Jeśli problem nadal występuje, skontaktować się z autoryzowanym dystrybutorem NSK.Przyczyna problemu2Reakcja pedału i przycisków bezprzewodowego sterownika nożnego jest słaba z powodu długiego okresu nieużywania.Działanie2Skalibrować sterownik nożny. => „6.2 Kalibracja sterownika nożnego”.
Surgic Pro2
- APrzyczyna błęduBłąd autokontroli.DziałanieZlecić naprawę.
- APrzyczyna błęduDługotrwałe użytkowanie pod dużym obciążeniem. Zwarcie w silniku. Awaria przewodu silnika (przewodu zasilającego).DziałanieStyk elektryczny może być niewystarczający. Ponownie prawidłowo podłączyć przewód silnika. Jeśli błędu nie można usunąć, zlecić naprawę.
- APrzyczyna błęduNieprawidłowe podłączenie przewodu zasilającego. Awaria obwodu zasilania.DziałaniePonownie prawidłowo podłączyć przewód zasilający. Jeśli błędu nie można usunąć, zlecić naprawę.
- APrzyczyna błęduAwaria czujnika silnika. Odłączony przewód silnika. Awaria przewodu silnika (przewodu sygnałowego). Przedostanie się wody do silnika.DziałanieStyk elektryczny może być niewystarczający. Ponownie prawidłowo podłączyć przewód silnika. Jeśli błędu nie można usunąć, zlecić naprawę. (Podczas czyszczenia w myjni-dezynfektorze należy pamiętać o założeniu zatyczki ochronnej).
- APrzyczyna błęduPrzegrzanie spowodowane długotrwałym użytkowaniem pod dużym obciążeniem. Użycie bezpośrednio po przebywaniu jednostki sterującej w wysokiej temperaturze (np. wewnątrz samochodu wystawionego na intensywne działanie promieni słonecznych lub w szafce narażonej na bezpośrednie działanie promieni słonecznych).DziałaniePrzed użyciem pozostawić urządzenie do ostygnięcia. Aby zapewnić odpowiednie odprowadzanie ciepła, należy w miarę możliwości zapewnić dobrą wentylację wokół jednostki sterującej. Jeśli błędu nie można usunąć, zlecić naprawę.
- APrzyczyna błęduNieprawidłowe napięcie wygenerowane w obwodzie przełącznika start / stop. Awaria obwodu przełącznika start / stop.DziałanieGdy uruchamianie i zatrzymywanie obrotów jest wielokrotnie powtarzane w krótkich odstępach czasu, może zostać aktywowany obwód ograniczający nagłe przyspieszenie przy rozpoczęciu obrotów. Odczekać kilka sekund przed ponownym użyciem. Jeśli błędu nie można usunąć, zlecić naprawę.
- APrzyczyna błęduNieprawidłowe zamocowanie wiertła lub narzędzia wiertniczego. Awaria rękojeści. Awaria silnika.DziałanieUchwyt może być nadal otwarty lub niedostatecznie zamknięty. Prawidłowo zamknąć uchwyt. Jeśli błędu nie można usunąć, zlecić naprawę.
- APrzyczyna błęduNieprawidłowo zamontowany przewód irygacyjny został przytrzaśnięty przez rolkę pompy. Awaria pompy irygacyjnej.DziałanieSprawdzić przewód irygacyjny. Jeśli błędu nie można usunąć, zlecić naprawę.
- APrzyczyna błęduAwaria obwodu komunikacji Bluetooth.DziałanieZlecić naprawę.
- APrzyczyna błęduAwaria czujnika sterownika nożnego (układ scalony Halla). Błąd autokontroli.DziałanieZlecić naprawę.
- APrzyczyna błęduOsadzenie się roztworu soli fizjologicznej na diodzie LED silnika. Awaria obwodu LED.DziałanieCałkowicie usunąć roztwór soli fizjologicznej. Jeśli błędu nie można usunąć, zlecić naprawę.
- APrzyczyna błęduAwaria sterownika wyświetlacza LCD. Awaria arkusza elektrostatycznego.DziałanieZlecić naprawę.
- APrzyczyna błęduAwaria przewodu połączeniowego. Awaria obwodu Link Module. Awaria obwodu komunikacji Bluetooth w Link Module.DziałanieWyłączyć VarioSurg 3 i ponownie prawidłowo podłączyć Link Module. Jeśli błędu nie można usunąć, zlecić naprawę.
- APrzyczyna błęduZakłócenia elektromagnetyczne emitowane przez urządzenia elektroniczne. Awaria obwodu komunikacji Bluetooth w Osseo 100+.DziałanieZachować odpowiednią odległość między końcówką Osseo 100+ a urządzeniami elektronicznymi. Jeśli błędu nie można usunąć, zlecić naprawę.
- APrzyczyna błęduSystem operacyjny terminala zewnętrznego nie jest obsługiwany. Awaria terminala zewnętrznego.DziałanieSprawdzić w aplikacji, które systemy operacyjne są obsługiwane. Ponadto ponownie zainstalować aplikację. Jeśli błędu nie można usunąć, zlecić naprawę.
- APrzyczyna problemu1Wtyczka jest nieprawidłowo podłączona do źródła zasilania.Działanie1Sprawdzić, czy wtyczka jest prawidłowo podłączona.Przyczyna problemu2Awaria wyłącznika zasilania.Działanie2Zlecić naprawę.
- APrzyczyna problemu1Zasilanie zostało włączone przy naciśniętym sterowniku nożnym.Działanie1Zdjąć stopę ze sterownika nożnego.Przyczyna problemu2Awaria sterownika nożnego.Działanie2Jeśli problem ustępuje po wyjęciu baterii, oznacza to awarię sterownika nożnego. Jeśli nie, oznacza to awarię jednostki sterującej. Skontaktować się z autoryzowanym dystrybutorem NSK.Przyczyna problemu3Awaria jednostki sterującej.Działanie3Jeśli problem ustępuje po wyjęciu baterii, oznacza to awarię sterownika nożnego. Jeśli nie, oznacza to awarię jednostki sterującej. Skontaktować się z autoryzowanym dystrybutorem NSK.
- APrzyczyna problemuSterownik nożny nie jest połączony.DziałanieNaciskać i przytrzymywać pedał regulacji prędkości sterownika nożnego, gdy na wyświetlaczu LCD widoczny jest komunikat „PUSH FC”. Jeśli ekran nie zmieni się po 5 minutach, nacisnąć i przytrzymać przycisk Cancel. Zostanie wyświetlony standardowy ekran. Patrz „3.2 Instalowanie baterii sterownika nożnego” i wymienić baterie sterownika nożnego, aby sprawdzić, czy można nawiązać połączenie. Jeśli po wymianie baterii nie można nawiązać połączenia, przeprowadzić parowanie zgodnie z „7.1.1 Parowanie ze sterownikiem nożnym”. Jeśli problem nadal występuje, skontaktować się z autoryzowanym dystrybutorem NSK.
- APrzyczyna problemu1Sterownik nożny nie jest połączony.Działanie1Po upewnieniu się, że nic nie blokuje sygnału między sterownikiem nożnym a jednostką sterującą, wykonać następujące czynności. Wyłączyć zasilanie jednostki głównej, a następnie ponownie je włączyć, aby nawiązać połączenie z jednostką sterującą. Patrz „3.2 Instalowanie baterii sterownika nożnego” i wymienić baterie sterownika nożnego na nowe. Przeprowadzić parowanie zgodnie z „7.1.1 Parowanie ze sterownikiem nożnym”. Jeśli problem nadal występuje, skontaktować się z autoryzowanym dystrybutorem NSK.Przyczyna problemu2Reakcja pedału i przycisków sterownika nożnego jest słaba z powodu długiego okresu nieużywania.Działanie2Skalibrować sterownik nożny zgodnie z „6.3 Kalibracja sterownika nożnego”.Przyczyna problemu3Awaria jednostki sterującej lub sterownika nożnego.Działanie3Jeśli sprawdzenie baterii sterownika nożnego lub stanu jego połączenia nie rozwiąże problemu, konieczna jest naprawa systemu.
- APrzyczyna problemuSterownik nożny nie jest połączony.DziałanieNacisnąć przycisk Cancel, aby anulować błąd. Po upewnieniu się, że nic nie blokuje sygnału między jednostką sterującą a sterownikiem nożnym, odczekać chwilę i sprawdzić, czy sterownik nożny połączy się automatycznie. Jeśli połączenie nie zostanie nawiązane automatycznie, wykonać następujące czynności. Wyłączyć zasilanie jednostki sterującej, a następnie ponownie je włączyć, aby nawiązać połączenie ze sterownikiem nożnym. Patrz „3.2 Instalowanie baterii sterownika nożnego” i wymienić baterie sterownika nożnego na nowe. Przeprowadzić parowanie zgodnie z „7.1.1 Parowanie ze sterownikiem nożnym”. Jeśli problem nadal występuje, skontaktować się z autoryzowanym dystrybutorem NSK.
- APrzyczyna problemuLink Module nie jest połączony.DziałanieNacisnąć przycisk Cancel, aby anulować błąd. Po upewnieniu się, że nic nie blokuje sygnału między jednostką sterującą a Link Module, odczekać chwilę i sprawdzić, czy Link Module połączy się automatycznie. Jeśli połączenie nie zostanie nawiązane automatycznie, wykonać następujące czynności. • Wyłączyć i ponownie włączyć zarówno ten produkt, jak i podłączony do niego VarioSurg 3. • Zapoznać się z instrukcją Link Module i ponownie przeprowadzić parowanie. Jeśli problem nadal występuje, skontaktować się z autoryzowanym dystrybutorem NSK.
- APrzyczyna problemuOsseo 100+ nie jest połączony.DziałanieNacisnąć przycisk Cancel, aby anulować błąd. Po upewnieniu się, że nic nie blokuje sygnału między jednostką sterującą a Osseo 100+, odczekać chwilę i sprawdzić, czy Osseo 100+ połączy się automatycznie. Jeśli połączenie nie zostanie nawiązane automatycznie, wykonać następujące czynności. • Wyłączyć i ponownie włączyć zarówno ten produkt, jak i podłączony do niego Osseo 100+. • Naładować akumulator do odpowiedniego poziomu za pomocą ładowarki Osseo 100+ i ponownie spróbować nawiązać automatyczne połączenie. • Zapoznać się z instrukcją Osseo 100+ i ponownie przeprowadzić parowanie. Jeśli problem nadal występuje, skontaktować się z autoryzowanym dystrybutorem NSK.
- APrzyczyna problemuNiski poziom naładowania baterii sterownika nożnego.DziałanieNacisnąć pedał regulacji prędkości sterownika nożnego lub przycisk Cancel, aby anulować błąd. Wymienić baterie. Jeśli problem nadal występuje, skontaktować się z autoryzowanym dystrybutorem NSK.
- APrzyczyna problemuNiski poziom naładowania akumulatora Osseo 100+.DziałanieNacisnąć pedał regulacji prędkości sterownika nożnego lub przycisk Cancel, aby anulować błąd. Naładować akumulator do odpowiedniego poziomu za pomocą ładowarki Osseo 100+ i ponownie spróbować nawiązać automatyczne połączenie. Jeśli problem nadal występuje, skontaktować się z autoryzowanym dystrybutorem NSK.
Higiena i konserwacja
iCare
- APrzyczyna1Przewód zasilający nie jest podłączony do gniazda.Rozwiązanie1Sprawdzić połączenie.Przyczyna2Przewód zasilający nie jest podłączony do iCare.Rozwiązanie2Sprawdzić połączenie.Przyczyna3iCare nie jest włączony.Rozwiązanie3Włączyć czarny wyłącznik zasilania (po prawej stronie iCare).Przyczyna4Przepalił się wewnętrzny bezpiecznik.Rozwiązanie4Wymienić bezpiecznik.
- APrzyczyna1Porty smarowania (1–4) nie są włączone (dioda LED złącza jest wyłączona).Rozwiązanie1Nacisnąć jeden lub więcej przycisków portów smarowania.Przyczyna2Drzwiczki są OTWARTE przed rozpoczęciem lub podczas pracy.Rozwiązanie2Zamknąć drzwiczki.Przyczyna3Drzwiczki są ZAMKNIĘTE przed smarowaniem uchwytu.Rozwiązanie3Otworzyć drzwiczki przed smarowaniem uchwytu.Przyczyna4Zbiornik oleju jest pusty (świeci się dioda ERROR (Oil)).Rozwiązanie4Napełnić olejem konserwacyjnym NSK iCare.Przyczyna5Brak dopływu powietrza lub ciśnienie powietrza jest zbyt niskie (świeci się dioda ERROR (Air Pressure)).Rozwiązanie5Sprawdzić dopływ i ciśnienie powietrza.Przyczyna6Temperatura w pomieszczeniu jest zbyt niska.Rozwiązanie6iCare działa w temperaturze 10–40°C. Szczególnie zimą należy odczekać, aż temperatura w pomieszczeniu osiągnie zakres temperatury roboczej.
- APrzyczynaOtwór dyszy do smarowania uchwytu jest zatkany zanieczyszczeniami.RozwiązanieUsunąć zanieczyszczenia z otworu za pomocą szczoteczki (nie używać metalowej szczoteczki).